
Adobe Captivate 2017 is packed with a ton of new features. One that you may have missed is the new WHILE condition in Advanced Actions. Even if you did notice it, you may be wondering: What is the point? Why would I use that? Or, how would I use that? Well how about something like this demo course? Please read on to discover how I built that demo.
WHILE conditions have been used in programming since… well, since there has been programming. The principle idea is to keep your program doing something while a condition exists. An example might be, “The button is blue while the mouse hovers over it.” Thankfully that logic is already built into Captivate (and most programs). But what about something like, “The alarm will sound while the character is exposed to gases”? Now we can build interactions like that in Captivate.
Before we dig into the more complex example let’s build a simple demo of the WHILE condition. In this example we will build a timer of sorts. Our statement will be, “count upwards while the counter is running”. We can view the output of this example here.
We begin by creating two variables:
- “counter” (defaults to 0)
- “run_counter” (defaults to 1)
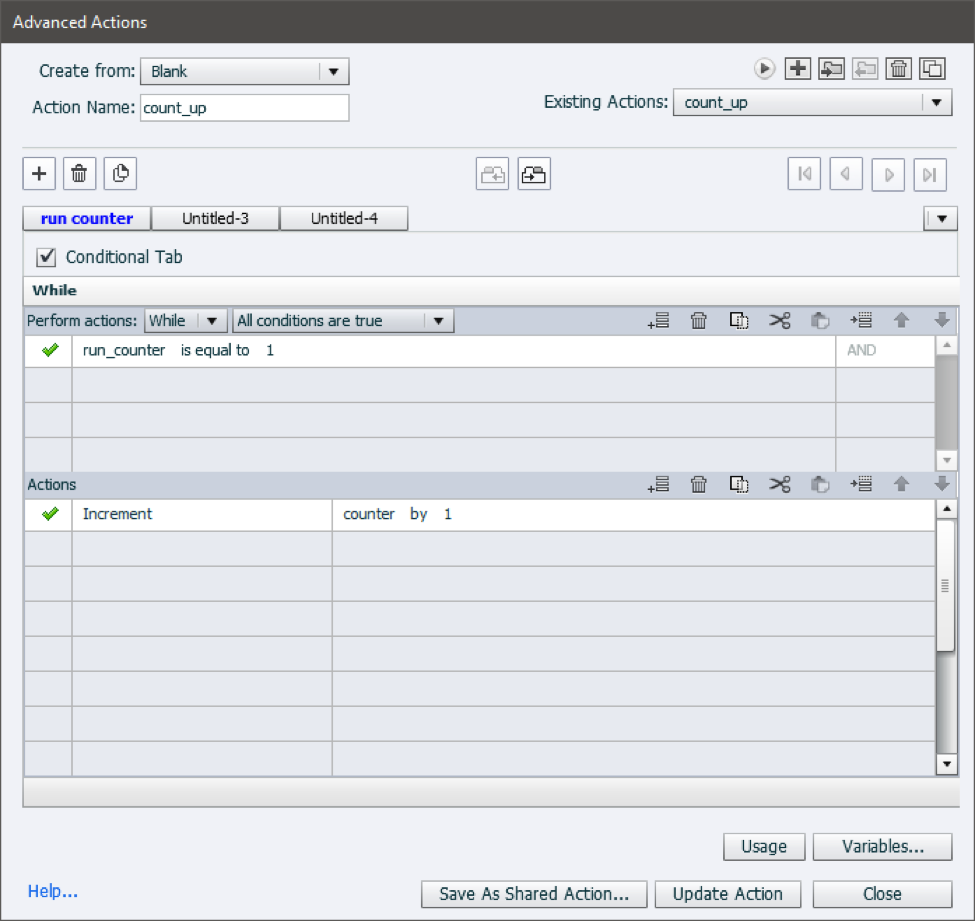
Next, we build our Advanced Action.
- Create a new Conditional Tab.
- Change the type to “While”.
- Our only Condition is: “run_counter” is equal to 1.
- The only Action is: Increment “counter” by 1.
- Name the Action “count_up” and save and close it.
- Set the slide On Enter Action to run our new count_up Advanced Action.
- Then we display those two variables on the slide so we can watch as the coolness unfolds.
When we preview the slide in the browser you will see that the counter steadily climbs upward, even when the timeline ends or pauses. Captivate runs the WHILE Loop every second so in effect we have just built a timer!
Now to add some complexity to our example we’ll create a few buttons with actions.
- Add a button and change the title to “Stop”.
- Set its action to Assign run_counter with the value of 0.
- Preview the slide in the browser.
Now when we click the stop button the run_counter variable will be set to 0. The next time our WHILE loop runs it will notice that run_counter is no longer equal to 1 and it will stop and exit the loop, which turns off our timer.
Watch the video below to see how to pause, restart, and reset the counter. One of the solutions I demonstrate in the video uses JavaScript to enable an Advanced Action to trigger another Advanced Action. To learn more about that technique see my previous blog post, How to Trigger Captivate Advanced Actions with Javascript.
https://www.youtube.com/watch?v=oZkyvQiIuYM
Now that we have a basic loop running we can use it to perform other actions. Really we can run whatever code we want every second. We can use these loops to run animations, play audio, blink objects, etc. Let your imagination run wild! And, if you would rather run it every five seconds,for example, you could add Captivate’s built-in “Delay Next Actions by” Action.
In the video below I walk through using the WHILE Loop to continuously spin an arrow until the Learner clicks stop. You can view the output of this example here.
https://www.youtube.com/watch?v=bJ5HN2Q6G9k
Finally, this video will show you how to build a more robust example with multiple conditions in our WHILE Loop. Click here to play with the fun demo.
https://www.youtube.com/watch?v=WQz5SxQM_9E
I hope this post has sparked your imagination and clarified what a WHILE Loop is and when/how you would use it. If so, please share your ideas in the comments below!
 James Kingsley has worked in the eLearning Industry for over 15 years. He has won several awards for combining technologies to produce better eLearning. He is an Articulate MVP. James is the Senior Technology Architect for eLearning Brothers and the Co-Founder of ReviewMyElearning.com. You can follow him on Twitter or connect with him on LinkedIn for additional tips and examples.